Tricky Hands with Analysis
(and seminar records)
Below are a selection of challanging hands to bid and/or play. Each hand comes with an analysis to help you understand how to play it.
For those of you who join me for my Saturday seminars, the dates next to each set correspond to the seminar in which we looked at those hands.
For an even better learning experience I am also adding the .pbn files for the hands. If you search for Shark Bridge and dowload the console you can upload the .pbn and play the hands through properly!
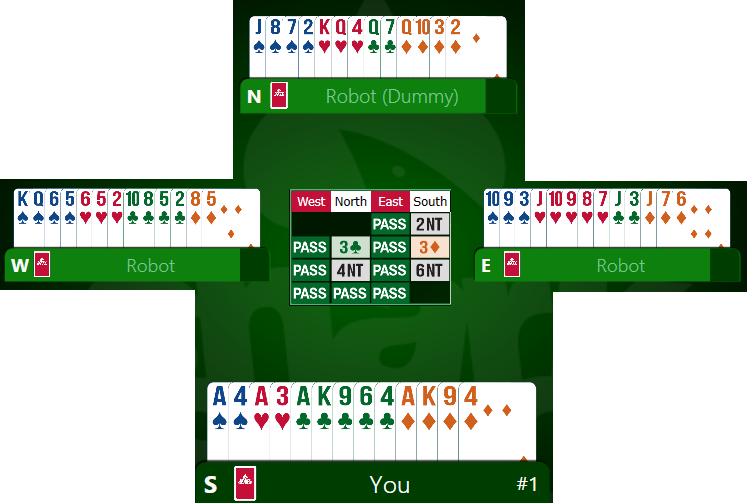
Set 1 – 17th October 2020
![]()
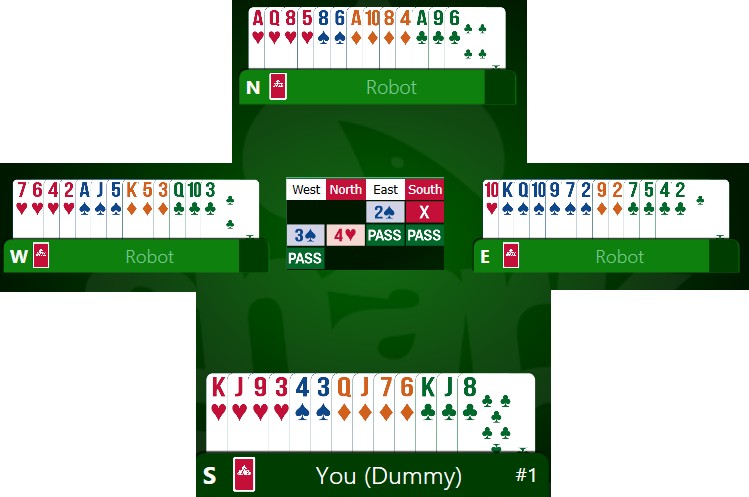
Hand 1

Bidding
Even though North has a long heart suit, this hand is too strong to open pre-emptively. East has a good hand to double. This is a take-out (SOS) double. It shows shortage in oppositions suit, opening points and support for the other 3 suits. Support is 3 cards in each suit unless you are doubling a major, in which case you are promising 4 of the other major. South has no response to 1 heart. In this position West should imagine that partner has opened 1 of their longest suit and bid as they would in that situation. If East had opened this auction 1 spade then West would have responded 4 spades. So this is what they should do here.
Play
North should lead the A of hearts. Now is the time to plan your hand. West can count 4 potential losers in hearts and 1 in diamonds. Your spades should be ok barring the worst possible split. You need to find a wat to get rid of 2 of them. You might be able to avoid a diamond loser if the finesse works, but this only gives you a 50% chance of getting rid of 1 loser. It is better in this hand to trump 2 rounds of hearts before you draw them all. You have all the top trumps so as long as you remember to trump high the opposition cannot stop you making your contract.
Hand 2
Bidding
East has a perfect 2 spade opener, 5-9 points and a good 6 card spade suit. Although South only has 11 points they do have a 4 card heart suit and their points are working. If they dont bid now they may never get into the auction. West has a 3 card fit with partner, but not enough points to be interested in game and so should just raise to the level of the fit. North has a hand which would have raised to 4 hearts if partner had opened 1 heart and so should raise to game. East/West may think about bidding 4 spades sacrificially. The vulnerabilities are right and even doubled it will turn out better for them.
Play
North can count 2 potential spade losers, 1 diamond and 1 club. You only need to deal with 1 loser then. When the diamond finesse works out for you, stop playing other suits and draw trumps. Win your winners. Any attempt to make over tricks is too risky here.
Hand 3
Bidding
East cannot bid until South completes the transfer. Once spades is the acive suit, East can double to get into the auction. West knows they have a heart fit but lacks game points so they should just bid 3 hearts. East has a hand worth 17 points but with partner bidding hearts at the lowest possible level 3 hearts is best.
Play
West can count 3 potential spade losers, 2 hearts and 2 diamonds. 7 losers is a lot, but dont panic. You need to get rid of 4 losers. You may be able to avoid some heart losers if the finesse works. However with the 1NT opening by South it is unlikely that this will succeed. You have a better chance at finessing the J of diamonds, eliminating 1 loser. You have two other hopes for this hand. You should start by trumping 2 rounds of spades. This is fairly safe given you know that the south hand is balanced. You can get rid of the rest of your losers by establishing the club suit in East. This hand requires some careful management of the trumps.
Hand 4
Bidding
With 2 5 card suits, North should open the higher ranking; hearts in this case. East has a close call here between 1 and 2 spades. Whichever they choose, South should double. In this position a double shows responding points and shortage in both suits bid. It therefor shows length in the minor suits. West will raise spades to the level of the fit. North should show their club suit. South has a choice now. They can choose to bid game in either clubs or hearts. If opposition bid to 4 spades you are best to raise to game in clubs.
Play
In either hearts or clubs North can count 1 potential spade loser and 2 diamonds. A successful finesse in diamonds will lead to 11 tricks.
Hand 5
Bidding
Although East only has 11 points it is right to double in this defensive position. West has a fairly weak hand and so should just respond 2 hearts. East has a nice shape, but not enough to go to game.
Play
A nice hand for a bit of cross-ruffing. This will limit your club losers to 1. A kind heart split means that you can make 10 tricks here.
Hand 6
Bidding
South is not perfectly balanced but must show their strength, 2NT will acheive this. North should check for a spade fit with stayman and then bid 4NT quantitatively. With a maximum hand South should raise to 6.
Play
Not an easy one! You might think about playing a couple of rounds of clubs to see if the 10 falls. Ultimately though the extra trick can only come from leading small to your J of spades. This means you needed to play the A at trick 1.
Set 2 – 31st October 2020
![]()
Hand 1
Bidding
Although South only has 9 points the hand conforms to the rule of 20. 6 clubs + 5 hearts = 11 + 9HCP = 20.
Despite the extreme shape of both North and South, they should take the bidding slowly. North should respond 1♦.
Since South can show hearts at the 1 level they should show their second suit.
North knows that they have game points and so bidding 3♠ is game forcing.
These hands clearly have no fit so North has to take a punt on 3NT.
Play
West leads the King of hearts. South can count 6 top tricks to start.
There is no way to try a club or diamond finesse given the opposite voids. The North heart suit is visible in dummy so you will never be able to make more than 1 trick there.
Your only hope is to set up one of your long suits. Which to pick? Your decision should be based on entries. You have only 2 certain entries into the south hand, but 4 into the north. This means that it will be easier to get back to winners you set up in the North hand.
So spades and diamonds are the long suits in the North. Although you are missing the QJ in both suits you do have the 10 of diamonds and the 109876 of spades, so hopefully some of these will make also.
Since you have 8 total and lots of the middle cards I would start with spades BUT you might want to think about cashing your diamond winners while you are in North.
Play out the AK of spades and the J will fall. Once the Q is gone you will get 2 more spade tricks.
Leading back and forth is nigh on impossible on this hand, but luckily you have good length in every suit so opposition will have to lead back to you eventually. Luckily on this hand they cannot cash in many tricks before you get back in control.
Hand 2
Bidding
East opens a standard 1♣. West has 2 four card suits so they should bid the lower ranked.
East does not have enough points to bid a new suit at the 2 level, so should just repeat their clubs.
There is no point in West mentioning their spades now – if East had 4 spades they could have bid them at the 1 level. 2NT will show a hand with 4 hearts, no club support and around 11 points. East has 14 points so they are on the verge of bidding 3NT but I would not count full value for the singleton king. Final contract 2NT.
Play
North leads the 6♥. West can count 5 top tricks.
Once the ace is gone you will make 2 more spade tricks, leaving 1 more to find.
The diamond finesse is worth a try, but will not work out for you here. Still, because you have the J10, once the Q is gone, you will make 1 more diamond trick. I would set this up as soon as possible.
You might make an extra trick or two out of the length in the minors, but prioritise ensuring your contract.
Hand 3
Bidding
West has 14 points and a balanced hand and so should open 1NT. East has a good strong hand and should check for a heart fit using stayman. When West shows a 4 card heart suit East should jump to game.
Play
North leads the 3♦. West can count 2 spade losers, 1 diamond loser and 1 club. They only need to get rid of 1 loser.
With such balanced hands it is not going to be possible to do any quick trumping, so trumps should be drawn at the beginning. They split nicely so can all be drawn.
You have 2 chances for an extra trick here. If the spades divide 3-3 in the opposition you can win an extra small spade trick.
The other chance is in clubs. In addition to the chance of setting up a small trick in clubs, you also have a chance for a finesse.
Once the trumps are drawn win a round with the A of clubs, to check for singleton queens. Then lead small towards the KJ. If north plays small, play the J. This will win the trick and you will need to cross back to West to take the club finesse again. You can always establish a spade entry.
Hand 4
Bidding
East has too many points to open 1NT. Since they have no 4 card major to show they should open 1♣, with the intention of rebidding no trumps.
South might think about bidding 1 spade here but I think the hand is too strong for a simple overcall. Doubling to show a strong overcall hand usually requires 16 points, but south is very close to this and has great shape.
North will take the double as take out at this point in the auction. They should therefor show their longest suit. With 7 points they should bid at the 2 level. Remember North is forced to bid here so bidding 1 heart would show no points.
South bidding 2 spades now shows a hand which was too strong for a normal overcall with a good spade suit (at least 5 cards).
North has a tricky choice here. They might choose to show their diamond suit, but this would be a new suit at the three level and game forcing. North knows that they have a minimum of 23 total HCP but this is not quite enough to force to game. 2NT will show an invitational hand with less than 3 card spade support. Clubs are a worry but North has very limited options here.
South also has a choice here. They may repeat their spade suit in which case a final contract of 4♠ is most likely.
However, partner has shown no spade support. South has almost definitely got 6 spade tricks and the KQ of clubs sitting over the club bid from the East hand. So a final contract of 3NT is also a good shout.
Play
We will look at the play for this board in 3NT by North. East leads Q♦. North can count 3 spade winners and 1 heart to start off with. Some work to be done!
Spades is your most hopeful chance of extra tricks here. The hope is that they will divide fairly nicely. You will only find this out by playing out the AKQ. Nicely on this hand the J will drop and you will make 3 extra spade tricks. This gets you to 7 total. 2 more needed.
You will get 1 club trick eventually but given your lack of stops in clubs and diamonds it is better not to lead these suits. Keep them for regaining control if you lose it.
Your only option then is the hearts. From the bidding you know that most of the missing poins are in East, so the finesse is unlikely to work. You will have to set up long suit tricks instead. You will have to lose the lead twice in order to establish the hearts. Luckily opposition can only cash 3 diamond tricks and the A of clubs before they have to lead back to you. You will just about make your 9 tricks.
Hand 5

Bidding
North has too many points to open 1NT. They should choose to show their major and open 1 heart.
East has a good hand for a double, short in hearts, 4 spades, support for the minors and 12+ points.
South doesnt have a strong hand but they have good heart support. With fit points the south hand is worth 11 points so they should respond 3 hearts.
West knows that partner has a 4 card spade suit. With a 9 card fit they should bid 3 spades.
North has enough to comfortably go to 4 hearts.
East might decide to pass at this point, but I think a sacrifice bid of 4 spades is a good idea.
If East bids then South must choose between 5 hearts and doubling 4 spades. Given the shape of Souths hand I think 5 hearts has a good chance.
Play
East should lead the king of spades.
North can count 1 potential heart loser, 1 club and 3 diamonds. They need to deal with 2 of these losers.
North has the opportunity to finesse the king of hearts and maybe the king of diamonds. There is also the possibility of making some extra tricks in diamonds if opps run out. Finally, if North can trump 2 rounds of hearts in the South hand this will create 1 extra trick. Normally we only trump in the short suit, but here with 4 hearts in 1 hand and 5 in the other, if you can trump twice in the longer suit that is a net gain of 1.
Most of these plans require leading small from South so watch your entries.
Finally, bear in mind that East has shown most of the missing points here, so the heart finesse is more likely to work than the diamond.
Hand 6

Bidding
South has a standard 1♥ opener.
West has a perfect take out double hand.
Although North only has 5 HCP they can count 2 extra points for the 2 doubletons and 1 for an extra trump. This makes the hand worth responding 2♥.
East does not have a strong hand, but they know they have an 8 card fit with partner. Bidding to the level of this fit means bidding 2♠.
South can count 1 extra point for an extra trump. They can also count 1 extra for the singleton queen (singleton = 3, q=2 cant double count so 3-2=1). This just about makes the South hand worth 3 hearts.
With 4 points for the void West is worth 17 points. The auction from this point is a bit of a matter of bravery.
West might choose to jump straight to game. Partner is showing 6-9 points and a spade suit (they didnt have to bid). With a hand worth 17 and lots of information from the bidding West might take a chance on 4 spades. It has a chance of making and will stop opponents if they want to bid 4 hearts.
If West chooses to only bid 3 spades then East will have to decide whether to raise to game or not. They would be well within their rights to pass.
Hopefully East/West will get to 4 spades, but they may end up playing in 3 spades.
Play
Whatever the final contract it will be played by East. South will lead the A of hearts (and be very dissapointed with the void in dummy!). East can count 2 spade losers (and 1 more if the worst possible spade split), 3 heart losers, 1 club loser (opps can have at worst Qxx in one hand then they are out), and 1 diamond loser. 7 total potential losers.
This is quite a lot but this hand has good potential. You will get one heart trump at trick 1 and then you should trump 1 more round quickly at the start. You need to keep 2 spades to trump the remaining hearts after the first trick so you can use a small spade to the king as one entry to East. After that you have no easy entry back to East.
You might as well try throwing a diamond. If opps are on the ball they will lead a spade back and dash your hopes of another heart trump anyway, but you never know. If they are not paying attention and lead anything other than a spade you can trump a diamond back into the East hand and ruff the last heart.
After this make sure to draw any trumps that are left. This will depend on the play so far so make sure to keep count.
Odds are good for the Queen of clubs to fall, so just play out the AK. The Q will come out and the rest of your clubs will be good.
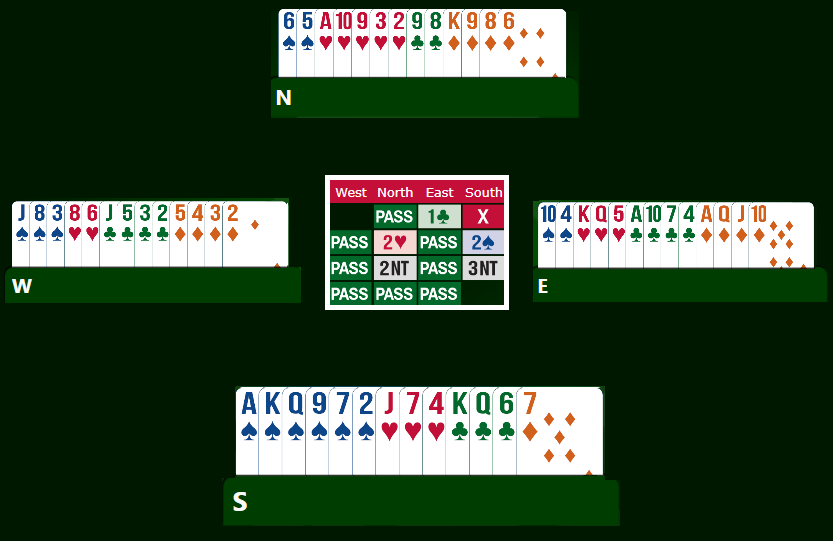
Set 3 – 14th November
![]()
Hand 1

Bidding
This is a very awkward hand. South cannot open. West’s only option is to open 1♣.
What is North to do? They do not have the right shape to double. Their only 5 card suit has been bid by opposition so they cannot overcall a suit and they do not have the points to overcall NT. With no available options North should pass and hope to be able to get into the auction later.
East responds 1 heart. West has nothing to show except their clubs, so a 2♣ rebid shows a hand with 12-15 points and at least 5 clubs.
North now finds themselves in the same position as before. Once again there are no available bids and they are forced to pass.
East’s second response should be 2 diamonds. This is not through the responder barrier and so is not game forcing. It shows a hand with 6-11 points and 5-4 in hearts and diamonds.
West now knows that they have a heart fit with partner. They can add 3 fit points for the singleton, making the hand worth 15 points. Partner has shown 6-11, if they have 10 or 11 then you should be in game. 3 hearts is invitational to game.
North must now resist the urge to bid. They have not had a chance to bid, but if opposition end up in a heart contract, North has a great hand for defence.
East has a hand worth 11 points and so should raise to 4 hearts.
When it is passed back round to North, they can now take their moment to strike. North knows that the trump split is bad here. If they have none then partner must have a decent suit.
From the bidding North can tell that E/W have an 8 card fit. That means that partner must have 5 hearts here. This is going to make life really hard for declarer.
North also has 2 tricks with their aces and a good chance of making another club trick.
All this should lead North to think that East is not going to make their contract here. Now that opps have reached game level they can jump in with a penalty double. East/West have nowhere to rescue to so 4♥x should be the final contract.
Play
South is on lead. With 5 cards in the trump suit the best lead is a small heart. Start using up declarers trumps straight away.
East does not yet know how much trouble they are in! They will expect to have 1 heart loser, 1 spade and 2 clubs. A plan to quickly trump a diamond will look to make this contract for East.
However, once North discards at trick 1 East knows that South started with 5 to the queen. They are now on the back foot. The rest of this hand is damage limitation.
In addition to the bad trump split the fact that South has all the hearts means that all the missing cards are sitting over the uncertain cards in the East. It is also not possible to finesse the queen. Although it is in the right hand, South can duck enough times to avoid losing the queen.
East should continue with the plan to trump diamonds. Win a trick with the ace and then lead a small one to trump.
You then need to try and get back into the east hand to lead another diamond. Your best chance is to lead small towards the queen of spades and hope that North has the ace and ducks it.
Unfortunately North will probably take the ace. Defence are on the attack on this hand so they want to get in control asap.
North should then lead the ace of clubs. When partner shows to be void in clubs, North can win the king of clubs and lead another club for South to trump. Even if East trumps, South can overtake whatever they play.
South should continue to lead hearts until there are none left in dummy.
East should be able to make another spade trick or 2, but south will continue to annoyingly overtake any trumps played from East.
Even trying their best East will only make 7 tricks here.
This board is a good lesson. Bidding 4 hearts was sound based on the available info. It is unfortunate that they defence hands are the worst they could possibly be for declarer.
Remember though, if everyone else bids 4 hearts and is doubled here then they will go down the same amount. If this happens to everyone then you will get an average score on this board.
Hand 2

Bidding
East opens 1♠. South has a nice hand but no 5 card suit to overcall and must pass. West only has 3 points so they pass as well.
North has more than 10 points and a good quality diamond suit, so they can comfortably overcall 2 diamonds.
East has a nice shape to their hand so it is worth sticking in a 2♠ bid.
South is now in a bit of a pickle. They know that they might have game points so they dont want to pass. They don’t have diamond support. Without being sure of game points they dont want to bid a new suit at the 3 level as this would be game forcing. I think that doubling is the most sensible choice.
A double here from South should show responding points (12+), 4 hearts (double of a major) and no diamond support. This is a pretty good description of the hand.
North knows that they have game points now. Bidding 3 clubs will show a 4 card club suit and a game forcing hand.
South has no support for the minors and a sure spade stop (maybe 2 since the spades are in East). 3NT is a good call from them.
Play
West has a grotty hand to lead from. There is no point in leading the 4th diamond in an attempt to set up long suit tricks. West is never going to be able to regain control to cash them in. Better then to lead the 3 of spades. If partner has bid a suit, lead it if you can.
South can count 3 tricks to start. Don’t worry! Just make your plan. Once the ace is gone South will make at least 1 more spade trick, but as this is opponents suit it is better to hold off playing spades and keep your stops.
N/S is missing the king of hearts so there is a possible finesse there. Similarly with the queen of clubs. The diamonds will yield 1 honour trick and may also give some tricks from the long suit in dummy if the divide is kind.
East will probably lead the jack of spades at trick 2 to try and clear the suit and set up some of their small ones. Declarer will have to win it in North with the king.
I would start by trying the heart finesse. You know from the bidding that the points are mostly in East so your finesses have a good chance. Start with the J. East has enough hearts to duck and protect their king. Their ducking will allow you to make 3 heart tricks though.
Then try the clubs. Win a round with the ace and lead small. This time the finesse will fail. West has no more spades to lead and will probably go for a diamond.
Opponents will have to lead back to your spades or diamonds.
With the 3 heart tricks, 2 clubs, and a diamond that gets South to 6 tricks. As long as they let opps lead spades they will also make 3 spade tricks, just about getting to the 9.
Hand 3

Bidding
North has a 5 card heart suit and so should open 1 heart.
East has a good hand for doubling here – 12+ points, short in hearts and support for the other suits including a 4 card spade suit.
South has 3 card heart support and 8 points so they should show that by responding 2 hearts.
West knows that partner has a 4 card spade suit. This makes a 9 card fit so they can raise to 3 spades.
North knows partner has a maximum of 9 points so game is unlikely. They may think about doubling West, but they do not have a particularly strong hand and the vulnerability is wrong.
Play
North will lead the king of hearts.
West can count 1 potential spade loser, 2 hearts, 1 club and 3 diamonds. 7 total. 3 spades was a sacrificial bid, and West is not vulnerable so they shouldnt worry too much.
Declarer may be able to finesse the queen of spades. There is little hope in hearts or clubs but they could try the diamond finesse. The diamond suit may also produce some long suit tricks.
West has lots of trumps so if they split kindly they can draw trumps and still have some left in East. You can take the spade finesse in either direction but the bidding suggests that leading towards the king jack is the best hope. This being so West should win a round with the Ace of spades first. When both opponents follow suit West has a tough choice between the spade finesse and playing for the queen to drop. The finesse will fail and the drop will work, but it is very hard to choose between these courses of action.
Either way, once declarer is back in control they should try the diamond finesse. They may need to lose a club in order to establish a club trumping entry into West.
The diamond finesse will work, and when played out West should also get an extra trick with the 4th diamond.
Overall West should lose 1 heart, 1 club, 1 diamond and maybe a spade depending on the choice of trump play. Either way the contract should make.
Hand 4

Bidding
West opens 1 heart. East has more than 10 points so they should bid their longest suit – 2 diamonds.
West has a choice here between rebidding 3 hearts or 2 spades – they need to be through the barrier. The trouble with 3 hearts is that if partner has spades they have to bid them at the 3 level, which is a game forcing bid. Better to rebid 2 spades then and make sure you dont miss a spade fit.
Once West shows 16+ points, East knows that they have a combined minimum of 31. On this hand East knows that not only do they have a spade fit, they also have a heart fit. Definitely worth 4NT asking for aces.
West will respond 5 hearts to show a hand with 2 aces.
East is only missing 1 ace altogether and so should bid a slam. With a double fit they can bid either 6 spades or 6 hearts. I would plump for 6 spades since a 4-4 fit gives the opportunity for extra tricks trumping in either hand.
Play
North has a horrible hand, but should give the singleton heart a try. This will work well for them, leading to a heart trump at trick 2. West will go 1 off.
If you choose to play this contract in 6 hearts then you can make it as opps cannot get the trump in at the beginning. C’est la vie.
Hand 5

Bidding
The bidding is straightforward here until we reach West’s second response.
East has shown a hand with 12-15 points and a 5 card diamond suit (probably 6 since they didnt rebid NT). West knows that there is no hope for a major fit. A second response of 2NT shows a hand with 11ish points and no support for partner.
East has 13 points and an almost certain 6 tricks in diamonds so should raise to game.
Play
North will probably lead the 3 of hearts.
West can count 5 sure tricks. The diamond suit is almost certain to give 2 more. 1 more will come once the ace of hearts is gone. The final trick will come from the club finesse.
Watch your entries into East. You may need to hold off winning diamonds to use the diamond honours to get into East.
Set 4 – 28th November
![]()
Hand 1

Bidding
Not an easy auction! North does not have a good enough spade suit to call a preempt. South is the first openable hand, and they will open 1 club.
West does not have a biddable shape and must just pass. North has an easy 1 spade response.
South might think about bidding 3 clubs here since they are the top of their range with a 6 card suit. If they stick to the points though then they must rebid 2 clubs.
This is where things get tricky. North has a choice between rebidding spades or bidding hearts. Partner had no opportunity to bid hearts at the 1 level so I would prefer to show those.
South is also faced with a choice. Partner is showing 5-4 in spades and hearts so no fit as yet. They might choose to bid 3 clubs to confirm a 6 card suit. The other choice is 2NT. In this position 2NT should say that South has no support for partner, but decent points.
Either way I think North should show their spades again, let partner know you have 6.
The auction will probably end in 3 spades, but if South is feeling VERY brave you might get to 4.
Play
North has 2 potential spade losers, 2 hearts, 1 diamond and no clubs. 5 total losers.
You will get 1 sure discard on the A of clubs so that brings you down to 4.
You have a possibility of a spade finesse, or of trumping a diamond before drawing. Of the two, trumping a diamond is the safer choice. Opps have 8 diamonds so they should hopefully both have at least 3.
Hand 2

Bidding
West should open this hand under the rule of 20. North has a good 1 heart overcall.
East can still show their 4 card spade suit at the 1 level.
South does not have quite enough points to investigate game so should just raise to 2 hearts to show 3 card support.
West will bid 2 spades to show 4 card spade support but ordinary opening points.
With a spade fit East can add 3 points for the singleton, making their hand worth 11. It is worth raising to 3 spades.
West will pass this out as they have minimum points.
Play
If defence are on the ball here then this is a very tricky hand.
South should lead hearts as partner has bid them, meaning that opps will take the first 2 heart tricks. They can then use info from dummy to find their aces. This means that you lose all the tricks you can afford at the start.
On the plus side, by the time you get in your diamonds and clubs are set up. You should try the spade finesse first though.
Once you have established that the finesse works you need to think about entries. If you finish drawing trumps straight away then you will never be able to get back to your diamond winners and will end up losing another club. Use a trump as entry to your diamond winners in the East hand.
This hand needs a careful balance of planning and playing the odds.
Hand 3

Bidding
North has 5-5 in the majors so should open 1 spade. South has enough points for a 2 level response and so should show clubs.
North rebidding 2 hearts shows at least 5-4 shape and 12-15 points.
South has a game forcing hand despite being only 11 points. If a suit fit is found it is worth 4 extra fit points, and in NT the club suit is hopefully worth 6 tricks. 3 diamonds is a game forcing bid.
North now has a chance to bid their hearts again to show 5-5 shape.
South still cannot support and so should opt for 3NT.
Play
West has a tough lead here, but a small diamond will at least signal an honour to partner.
As soon as you get in with the Q of diamonds you should start playing out the clubs. You will get some bad news after playing out the AKQ, the J is still out. If you keep playing clubs then they will win the J and then you have no way to get back to your remaining club winners.
Give up on clubs and switch to hearts. You are missing the AJ of hearts, odds are best to try and finesse the J so lead the 10. If west ducks then play small from North and East will have to play the Ace, setting up your KQ. The Jack will now fall when you play the KQ and turn the remaining hearts in North into winners.
Hand 4

Bidding
West and Easts first bids are standard.
West rebidding 2 diamonds shows a hand with 5 diamonds and 12-15 points.
East has a 5 card heart suit, but is not quite sure of game so they should bid 2 hearts.
With a heart fit West is worth 16 points and should probably go straight to game. If they choose to only bid 3 hearts then East should raise to game.
Play
You should get plenty of discards on the diamond suit, so draw trumps.
It is worth finessing, you will avoid losing to the J at least.
Once trumps are gone, try the diamond finesse. It will fail, but everything is set up for you to cash in now.
Hand 5

Bidding
North can open under the rule of 20. South has a minimum 2 spade bid.
West is where the interest lies. Count the tricks. You have 7 diamond tricks and the A of spades. You only need partner to have 1 trick to make 3NT. With south showing a weak hand odds are good. Take a deep breath and overcall 3NT.
Play
Dont mess around here. You have 10 top tricks, take them.
Hand 6

Bidding
South doesnt have enough points to bid, a shame with that heart suit!
East should open 1 club and North has a good hand for overcalling 1 diamond. East should show their spades.
West does not want to show the second suit since opps have bid it. Repeating clubs shows 5 clubs and 12-15 points.
East should rebid their spades to show a 5 card suit and not game points.
West will probably have to have a think at this stage. With 15 points it is a bit rubbish to give up at the 2 level, especially not vulnerable. 2NT should show no spade support, 14 or 15 points and diamond cover.
With 6 spades i think East should mention them 1 more time. West bidding 4 spades is a bit brave, but you know where the points are in opps.
Play
West has 2 spade losers and 2 heart losers at the start.
You have a good opportunity to throw away on clubs so you dont need to trump before drawing.
The spades fall nicely so you should only lose the A. This is the 1 loser you needed to get rid of. Push the clubs and throw away any losers from East on there, until opps trump in if they still have the A of spades.
Set 5 – 19th December
![]()
Hand 1

Bidding
South has a straightforward 1NT opener. West is not in a position to overcall as they do not have enough points.
When this was played in our lessons most people passed with the North hand. Usually with a minor suit this would be the right thing to do. But this is a very extreme hand.
North has few points but a 7 card diamond suit. So they know that 1. this will be horrible to play in 1NT as NS has a maximum of 18 points, 2. they have at least a 9 card diamond fit. This hand is extreme enough that you want to play it in diamonds.
The bidding will depend on whether you play minor suit transfers and which version you play. In the example shown NS are playing minor suit transfers where 2 spades is a transfer to 3 clubs and then you can correct to 3 diamonds if that is actually your suit.
If you do not play minor suit trnsfers then North should simply bid 3 diamonds (remember 2 diamonds would be a transfer to hearts). This will end the auction in 3 diamonds either way.
Play
East has a tricky hand to lead from. They do not want to lead clubs with an unsupported ace. King of diamonds is a possibility but it would give away the position of the trumps. So really they have a choice between the major suits. There is not much to call between the two but I would go for hearts as you can signal the suit length with MUD.
If defence are good they should take the first 3 tricks. There is not a lot extra to get out of this hand but you can just get to your 3 diamonds. If you play this hand in 1NT then you are going to go down!
Hand 2

Bidding
West has a straightforward 1 spade bid.
North has a hand which is just good enough for an overcall and so should bid 2 hearts.
This makes things difficult for East. They do not have enough points to bid their diamond suit at the 3 level, but they dont want to pass if they can help it. The answer is to double. Doubling in this position shows a shortage in both the suits bid, and so here shows that East has the minor suits. It also shows enough points to respond to partner. Ideally 10 here, but East has a better shape than they might so I think the double is justified.
West should simply bid 2 spades to show a hand with 12-15 points and a 5 card spade suit. When it comes back to East they know that they do not have a spade fit, but they do have a longer than shown diamond suit. Because of the shape of East it should be worth bidding game.
Calling 3 diamond at this point shows both the diamond suit and a game forcing hand.
West needs a little bravery here, but 3NT is the most sensible choice of final contract.
Play
Not easy! This requires careful planning.
North should always lead the Q of hearts. West can count only 4 top tricks.
Be cautious of hearts! You have only 2 heart stops and if opps lead hearts you will lose 1 of those at the beginning of the hand. This should make your mind up for you regarding your plan.
In order to establish any diamond tricks you will need to lose the lead twice, to the ace and king. So attempting to set up diamonds WILL NOT WORK. Once you have realised this you can look for other options.
You have finessing possibilities in spades and clubs. You need everything to work for you on this board so play as if it will!
You will be in the West hand after winning your heart so start with the club finesse. Here the king will emerge straight away and you can overtake with the ace.
You are now in the correct hand to try the spade finesse. Lead small and if South plays small put the queen in.
Now think about the spade suit. 4 spades have gone including the queen. This means that the KJ10 are still with opps. Even if you could get over to East you cannot take the finesse again as you do not have the J. Your only chance is that the spades divide evenly.
If you lead a small spade and lose the trick then when opps lead another heart you can get in, play the ace of spade, hold your breath, and then celebrate.
With 2 small spade tricks established and the success of the club finesse you can make 3NT without touching the diamonds! Just make sure to cash everything before you let opps in.
Hand 3

Bidding
North can open this hand, it complies to the rule of 20. With 2 five card suits they should open the higher ranked, 1 dimond.
This stymies East. They have no suit other than diamonds and are the wrong shape to double. They have no choice but to stay quiet for now.
North/South have a simple auction to 2 hearts.
Now is Easts time to strike! With 2 hearts the active bid they are now the right shape to double.
Once they do West knows that East has at least 12 points, a shortage in hearts and support for the other suits including a 4 card spade suit. With fit points West is worth 14 points and so should raise straight to game in spades.
Play
North is likely to lead the K of hearts. Since partner has bid them they are hoping that South has the ace and cen get a quick trump in. No such luck!
West has 1 potential spade loser (if the spades split 3-0), 3 potential heart losers and 3 potential club losers. This is quite a lot, but there are many opportunities on this hand to get rid of those losers.
The shortages create trumping opportunities, and the AK of diamonds opposite the void will give you 2 sure discards.
As soon as you win the A of hearts play a small spade to the Ace to make sure they are not 3-0. As soon as both opps follow you know the queen must fall if you play another spade to the king.
You can now win you AK of diamonds and throw some club losers away.
Cross ruff hearts and diamonds for as long as you can. You will have 1 trump left after this and 2 unavoidable losers. 11 tricks made total.
Hand 4

Bidding
South opens 1 spade. What should West do? Overcalling in NT will not show enough points.
With such a strong hand the correct thing to do is double first. Partner will take it as a take out double but the important thing is that West is ensuring themselves another bid.
East is forced to bid. If West had opened 1 club then this hand would be just about worth 3 clubs. When forced to bid you should definitely bid 3 to show your points.
West can now bid 3NT. They have a balanced hand with spade cover and they know that partner has some points (enough for game even if they were including a few fit points which will be void in NT).
Play
North should lead a spade as South has bid them and they have a shortage. Unfortunately this means that partner has to win the Ace and set up Wests king.
South has a tricky hand to lead from and another spade will probably do the least damage.
West needs to be careful to manage the lead on this hand. You have a chance at a heart finesse against the Jack, a diamond finesse against the King, and you need to make sure to win your clubs in the right order to win as many tricks as possible.
You can win trick 2 with the 10 putting you in East. Go straight for the heart finesse. It will work. Once the jack is located you can play a high heart to force the ace. Better to do this now while you have controls in the other suits.
South still wants to limit damage and they are hoping they might get 1 spade trick so they should lead another spade. You can win the trick with your Jack.
Now is the time to think about your clubs. If you play out the QJ and play low from East then you have no way to get back into the East hand! Your only choice is to cash the Queen of clubs and then overtake the Jack with the Ace or king. This allows you to cash 2 more club tricks.
If North has discarded a club you can win the last small club and you do not need to try the diamond finesse. If opps kept all their clubs then you can only cash 2 club tricks and need to try the diamond finesse. It will work for you on this one.
Hand 5

Bidding
East can open under the rule of 20.
South has 16 points and so should start with a double.
West has enough to raise to 2 hearts. East knows they cannot have game points so they should pass.
South can now bid 2 spades. This will combine with the double to show 16+ points and a 5 card spade suit.
North should raise to 3 spades to show good spade support. South is worth 19 points with fit points so I think it is worth raising to 4 here, but it is a close run thing. Vulnerable I would not blame you passing 3 spades!
Play
West should definitely lead the A of hearts. They can take the first 2 heart tricks, but then they must choose a new suit.
Diamonds is indicated by the strength in dummy. Unfortunately on this hand whatever they play South can only make 9 tricks as East has both the Ace of spades and the Ace of diamonds.
Set 6 – 02nd January 2021
Hand 1

Bidding
South has a hand worth 14 points (3 extra for the singleton and 1 for an extra trump). They should therefor raise straight to 4 hearts.
North knows that they have a minimum value of 31. They might consider blackwood but with 3 aces and an extra heart I think North is strong enough to go straight to 6 hearts.
Play
East has a tricky hand to lead from. They know that partner cannot have many points so leading small from an honour is not likely to lead to tricks. I would lead a heart as it is not likely to give anything away.
North can count 2 potential spade losers, 1 club and 1 diamond. The spades should be easy to take care of by trumping, even if you have to draw 3 rounds you will still have enough.
So you just need to deal with 1 more loser. There are 2 chances on this hand – you can make 3 club tricks if they divide 3-3 in opps, or you can try and finesse your queen of diamonds.
The odds are better for the diamond finesse (always 50%). Draw the trumps, making sure to end in the north hand. Note that the diamond finesse means leading small towards your queen and hoping the king is in east. Leading the queen from south will NEVER make an extra trick if you dont have the jack. So lead the 5 of diamonds towards the queen.
If east plays small put your queen in, if they play the king play small and your queen is established for next time. This is the best thing for them to do if they want to make sure of making their king.
You will get back in on the next trick. Make sure to win the ace of diamonds before using a trump to cross to south and cash the queen of diamonds. Throw away the 10 of clubs on the queen of diamonds, and that is your other loser dealt with! 12 tricks
Hand 2

Bidding
Although South only has 19 points it is such a nice hand that I think it is worth opening 2NT, you dont want to get stuck in 1 club!
North also has a nice hand, but dont get ahead of yourself. Check for a major fit first with stayman.
Once North recieves the negative stayman response they will need to have a think. North knows that they are definitely in slam territory. With the points they have they should just be safe to go to 6NT – opps can oly have 6 points and so cannot have 2 aces.
If North does want to make sure then they may consider using Gerber. Note that 4NT in this auction would be quantitative, not blackwood. If north wants to ask about aces (and maybe kings) then they cannot use 4NT and must instead use 4 clubs, Gerber. This does the same job as blackwood, asks partner for aces. Gerber responses start at 4 diamonds showing 0/4 aces and goes up in steps. Here 4 spades shows 2 aces. Note that because you get your response at the 4 level you can also check for kings and still sign off in 5NT.
In any case North should reach a final contract of 6NT.
Play
West has a pretty grotty hand, they will probably lead a small club.
South has 10 top tricks to start. There are a few opportunities here. There are finesses available in all suits but spades.
Hearts are your best chance here as they are your best quality suit, and you have 7 between the 2 hands, so they might yield an extra trick from length too.
Whatever suit west leads, take the finesse. If they lead a small club then play the 10 and let it ride. If they lead a small diamond then play small from north round to the queen. This will take care of 1 finesse.
The lead should now be in the south hand. Now start on the hearts. Make sure to win the king first to unblock the suit. Then lead the 10 of hearts. If west plays small, play small from north and the 10 will win. Now when you play the 8 of hearts the queen will emerge and you can overtake with the ace. Cash your jack and your contract is made.
Since you have now established your contract, and still have control in all suits there is no harm in trying the diamond finesse too. It will work on this hand and allow you to make all 13 tricks.
Hand 3

Bidding
Wests hand conforms to the rule of 20 and so should open 1 club. North’s diamonds are not quite good enough to overcall. East should choose to show their major.
Here’s where things get interesting. South has 7 points and an eight card heart suit. They should make a weak jump overcall to 4 hearts. Remember that this shows exactly the same kind of hand as would open 4 hearts pre-emptively.
This puts West in a tricky position. They must either double 4 hearts or bid 4 spades. With a spade fit and a singleton hearts I think 4 spades is better.
North knows that they have an 11 card heart fit and so should raise to 5 hearts.
East now also has to choose between doubling and bidding 5 spades. It is a very close call! With a singleton king of hearts I think bidding 4 spades with the east hand is totally justified. You know that in a heart contract by opps your singleton king is totally worthless. At least if you play in spades you can count the fit points.
If East decides that 5 spades is too risky then they MUST double 5 hearts. North/South are bidding preemptively and so must not be left to play in a contract undoubled.
Play in 5♥x by South
West should lead the King of spades.
South can count 1 spade loser, 1 heart, 1 club and 2 diamonds.
Draw trumps and the king of hearts will fall. The rest of the losers are unavoidable but remember that this is a sacrificial contract and 2 off is not bad!
Play in 5♠ by East
South should lead the ace of hearts. This is opposed to the usual rule against leading unsupportes aces, but on this hand you know that E/W only have 2 hearts between them. If they are 2-0 then your ace will be trumped anyway. If they are 1-1 then south wants to grab the ace before they can throw one away.
East has 1 sure loser to the A of spades and maybe one to the 10. They also have a heart loser (if south leads the ace) and 2 diamond losers. However they do have a very nice second fit in clubs.
You are likely to get back on lead at trick 2 unless defence lead a spade, in which case at least the ace is likely to be flushed for you.
Finish drawing the trumps, they divide nicely. Start from west with the jack of diamonds and try the finesse. You only need to do this once as the rest of the diamonds can be thrown away on clubs. Make sure to win your KQ of clubs first before crossing to west and cashing the rest. 11 tricks.
Hand 4

Bidding
Pretty straightforward to start. When it comes to south’s second bid, remember that they can add fit points and so should bid 3 spades to show a hand worth 16-18 points. North is very balanced and has no extra trumps so I would choose to pass 3 spades.
Play
Not easy!! East should lead the king of clubs. This should lead to E/W taking the first 3 club tricks. Note that it is best for defence to overtake with the Ace in the West hand to unblock the suit.
North can now only afford to lose 1 more trick. There should be no need for cross ruffing as the diamonds can be thrown on the hearts in south. Start by drawing trumps then.
On round 2 of drawing you will get the news of the bad spade split. You cannot now afford to draw any more trumps!
Time to bait the opps. Play 1 round of hearts and get the good news that the queen falls. Now what? You cannot afford to play a spade as this will mean opps make both their remaining jack and 9. You also need to keep a spade as entry into south!
You have to play another top heart. Play the king and west will have to choose to play a spade, in which case they can no longer make both their spades as you can draw the last one, or duck and let you win your king. If they duck, keep going. With this plan you should lose 1 of the 2 spades in west, but make the rest. Just about 9 tricks!
Hand 5

Bidding
East has a lovely hand, it is only 1 trick away from opening 2 clubs as a hand that can make game on its own. As it is it has to open at the 1 level.
South has a choice to make. Technically they could overcall 1 spade, but it is far more suitable as a pre-empt hand. Although it is 10 points you should not count full value for the singleton king.
With a 7 card suit south should overcall 3 spades (there is an argument for bidding 4 spades in this position – it makes life super hard for E/W).
West does not have enough to bid and north cannot support partner so they will pass too.
East now has a choice. If they are brave they will bid 4 hearts. As I said, this is a very nicely shaped hand. Opps are only bidding preemptively so they are not showing points.
The other option is to double. Partner will then be forced to bid and you can find out more about their hand. Either way 4 hearts is a good final contract.
Play
A nice straightforward one on the play side!
South is likely to lead the K of diamonds or a small heart. East has all winners save the AK of diamonds. 11 tricks.